カスタム ギャラリー コントロールを使って、セルに選択した内容を挿入する例です。
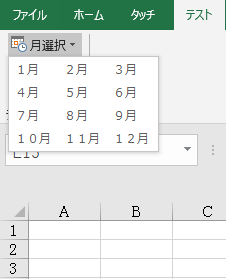
リストの何番目が選択されたかは「selectedIndex 」で取得できます、それによって、挿入する内容を変えればいいです。
 XML・customUI.xmlの記述例:
<?xml version="1.0" encoding="Shift_JIS" ?>
<customUI xmlns="http://schemas.microsoft.com/office/2006/01/customui">
<ribbon>
<tabs>
<tab id="CustomTab" label="テスト">
<group id="Group1" label="テストグループ1">
<gallery id="MonthGallery" imageMso="DateAndTimeInsert" label="月選択" columns="3" rows="4" onAction="Module1.Macro1" >
<item id="Month1" label="1月"/>
<item id="Month2" label="2月"/>
<item id="Month3" label="3月"/>
<item id="Month4" label="4月"/>
<item id="Month5" label="5月"/>
<item id="Month6" label="6月"/>
<item id="Month7" label="7月"/>
<item id="Month8" label="8月"/>
<item id="Month9" label="9月"/>
<item id="Month10" label="10月"/>
<item id="Month11" label="11月"/>
<item id="Month12" label="12月"/>
</gallery>
</group >
</tab>
</tabs>
</ribbon>
</customUI>
VBAの方では
VBA・標準モジュール、Module1の記述例:
Sub Macro1(control As IRibbonControl, selectedId As String, selectedIndex As Integer)
ActiveCell.Value = MonthName(selectedIndex + 1)
End Sub
リボンのカスタイマイズ方法トップ

 ギャラリーコントロールを使う・その1